


Top 10 Android Apps of the Month – March 2014
Brand loyalty is incredibly powerful these days and if you don’t have it, building it in today’s market is extremely difficult. Samsung have maintained good bran loyalty with their customers through perks and freebies, but when they launched Milk Music, they offered something only to their users that everyone else has been offering for a lot longer. Milk Music is nothing special, but it’s nice to be able to get something that other users can’t, and we’re sure this has made a lot of Samsung fans very happy, it’s just a shame Samsung didn’t try all that hard. It’s also only available in the US, which is a bit of a downer.


Top 10 Android Apps of the Month – March 2014
Since the Moto X launched last year we’ve all been looking for the same sort of functionality as the Active Display from Motorola. While these results can be achieved with some tomfoolery and with the help of root, not everyone wants to go that far. Not to mention the battery impact that using the display like that has on most devices. This is where AcDisplay comes in, and gives you similar functionality, by simply popping up these notifications on your display for a moment or two for you to action them. It’s simple and easy to use, while not blaringly obvious like that of the iPhone.
Did you end up here by searching how to root your Micromax A110 Canvas2 running on Jelly Bean ROM, then first let me make you clear that this post is providing guides for rooting your Micromax A110 Canvas2 running on Stock OS which comes with your phone when you have bought it from some stores. Second, if you have updated your phone to Jellybean OS from your nearest service center. The process to root Micromax A110 Canvas2 running on Jellybean OS is bit different compared to stock OS which is explained clearly in the second tutorial. So just keep an eye on the process you choose before you start your rooting process.


Proceed At Your Own Risk
Please apply the information given in this blog(Mobiada) at your own risk and responsibilities and any damages caused by following our tutorials or Guides will not be acknowledged by us.
Basic Prerequisites Before Rooting:
As rooting process involves loss of data it is advised to backup all your valuable data which might be restored after wards when you need it. In case you loose your data or get your data corrupted you can always have your backup to restore it back.
Caution: Rooting will void the warranty of your product. So do at your own risk.
Things you need to back up: Create a backup of all the data like call log, messages (How to Backup SMS and Restore it on any Android Device), applications , music, videos and other data which is present in the phone, so that you can restore the same once the rooting process is completed.
Enable USB debugging mode (Menu (app drawer) > Settings > Developer Option/Development > USB Debugging – check box) [Guide to Enable USB Debugging mode on various Android Versions]
Also be sure that your battery is not below 85% if not you could get your device turned off in the middle of the firmware update.
See that all your security suites like antivirus and firewalls are disabled on your computer.
Make sure you have installed Micromax A110 Canvas 2 USB drivers provided along with the device at purchase. (Micromax A110 Canvas 2 Original USB drivers)
Step By Step Guide To Root Micromax A110 Canvas 2 Running Stock OS:
Step 1: Download the Bin4ry Rooting Toolkit and extract it in your computer.
Step 2: Connect your Micromax A110 Canvas 2 to your computer with the help of the original USB cable provided in the sales package at the time of purchase. Wait for some time for the drivers to install. Usually drivers will be installed automatically, if you face any problems in the installation then use Pdanet to install your drivers manually.
Step 3: Once your computer detects your phone, change the mode of your Canvas 2 device from USB storage to Media Device.
Step 4: Open the files in the folder which you have downloaded and extracted in the step 1.
Step 5: Choose RunMe and click on the file. A CMD screen appears with some options.

Step 6: In the window you will be asked to choose one option among Normal and Special. You need to choose Normal Mode by pressing 1 and then hit Enter.

Step 7: Now follow all the instructions carefully to complete the rooting process. Your phone will reboot during this process in order to copy some files, so dont panic but just be patient for the entire process to carry out completely. You need to wait till the green letters in Command prompt say have Fun!. Once your phone is turned ON, you will find “superuser SU” app among your apps in the apps drawer.
Where you expecting anything more, now just check if your Micromax A110 Canvas 2 phone is rooted or not with root checker app.
Note : If you are unable to find SuperUser in your apps drawer install it from Google Play Store.
How To Flash The CWM Recovery:
- Download the CWM recovery file from here.
- Rename the file to recovery.img and Transfer the renamed file to your phone SD card.
- Download MobileUncle MTK tools from Google Play on your Micromax A110 and install it.
- Open the MTK tools app.
- Select update recovery option, now choose the recovery.img that you have just transferred to your Micromax A110.
- The app will flash CWM recovery on your A110 now.
Step By Step Guide To Root Micromax A110 Canvas 2 Running On Jelly Bean OS:
- Step 1: Download Latest CWM Recovery for Micromax A110 Canvas 2 and rename the downloaded file to recovery.img. Also download MT6577_Android_scatter_emmc.txt from here.Step 2: Next download the Flash_Tools.rar and extract it in your computer.Step 3: Open Flash Tools from the downloaded file and run Flash_tool.exe.Step 4: Click Scatter-loading and select the downloaded file MT6577_Android_scatter_emmc.txt.Check recovery option and uncheck all other options.Step 5: Click on Recovery and select the cwm recovery image called the recovery.img. Make sure to switch off your phone and connect it to your pc.Step 6: Remove your phone from your computer. Click the Download button provided in the Flash tool.Step 7: Reconnect your phone to the computer. Ensure the drivers for your phone are installed on your computer. If it is done correctly, a green ring appears on the screen indicating the progress.Now your Micromax A110 Canvas 2 running on Jellybean OS is successfully flashed. Check your device withroot checker if it is rooted or not.
Guide To Show How To Install Superuser Manually:
1. Download Super user binaries. Move it to the root of your sdcard.
2. Switch off your handset.
3. Press Power + Volume Up + Volume Down buttons to boot your device in CWM mode.
4. Press Volume Up button to continue to Clockworkmod Recovery. Use your volume keys to navigate the options and power button to make selections.
5. Select Install zip from SD card. After finishing, Reboot your Micromax A110 Canvas 2 normally.How To UnRoot Micromax A110 Canvas2 To Stock Rom:
Step 1: The Procedure to unroot Micromax A110 Canvas2 is same as rooting till your reach CMD with green letters which are explained in the first tutorial. You need to follow the same procedure.Step 2: Instead of typing “1″, type “x” and hit enter. Follow the instructions that appear on the command prompt after that and your Micromax phone will be back to stock state with warranty

When it comes to phone displays, bigger seems to be better for most of us. The attraction of bigger screens is all too enticing yet sometimes we struggle with how to fit our monstrous phones in our pockets. Or is that just me? It used to be a sought after feature to have the smallest phone possible, and now we’re swinging back in the other direction. Instead of having smaller displays, things have shifted to the desire of having smaller and smaller bezels, allowing for bigger screens and more usable screen space for UI interaction. Just how much of your phone is actually the screen though? Phones are always listed as having a certain size display but when you factor in the bezels things could shape up to be a tad bit different than we imagine. To see just how much of the phone screen we actually get for use, the folks over at the @somospostpc twitter account worked up some percentages of some of today’s most popular devices, along with some older ones.
The chart that was mocked up by @smospostpc gives us a look at the percentage of the screen to bezel ratio for various devices. We can see that the LG G2 comes out ahead of the rest with 75.7% of the screen actually being the screen, while a phone like Apple’s iPhone 3GS brings up the rear of the chart with barely over half of the display being the screen, marked at 50.8%. Other phones like the Galaxy Note 3 and The Moto X have screens that account for 74.6% and 72% respectively, while the Galaxy Note 2,(a phone with a bigger display than the Moto X) only has a screen that accounts for 68.4%. This leads us to the position of the bezel on the phones and that it has more of an effect than people might realize. This is especially true when you look at devices that have larger displays like the Note 2 phablet, which has less screen space percentage wise then phones with smaller displays. While the possibility of having a phone with no bezel at all(like reports are suggesting for the Galaxy S 5)remains in question, manufacturers are trying to make the bezels as small as they can. This trend continues with future devices as it likely will for some time. Do you think it will be possible to get a phone that has a screen that is actually 80% screen or higher?
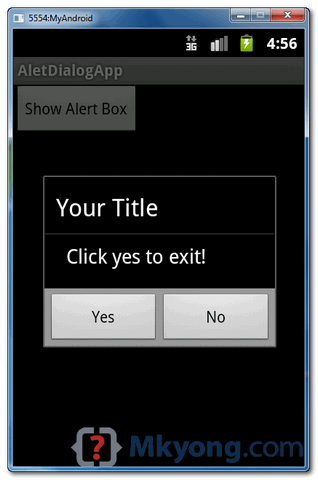
In this tutorial, we show you how to display an alert box in Android. See flowing Steps :
File : res/layout/main.xml
File : MainActivity.java
 When button is clicked, display the alert box
 If “Yes” button is clicked, close the activity and return back to your Android main screen.
- First, use the
AlertDialog.Builderto create the alert box interface, like title, message to display, buttons, and button onclick function - Later attach above builder to
AlertDialogand display it. - Done.
1 Android Layout Files
Simpel layout file, display a button on screen.File : res/layout/main.xml
<?xml version="1.0" encoding="utf-8"?>
<LinearLayout xmlns:android="http://schemas.android.com/apk/res/android"
    android:layout_width="fill_parent"
    android:layout_height="fill_parent"
    android:orientation="vertical" >

    <Button
        android:id="@+id/buttonAlert"
        android:layout_width="wrap_content"
        android:layout_height="wrap_content"
        android:text="Show Alert Box" />

</LinearLayout>
2. Activity
When user click on this button, display the alert box, with your pre-defined alert dialog interface.File : MainActivity.java
package com.mkyong.android;

import android.app.Activity;
import android.app.AlertDialog;
import android.content.Context;
import android.content.DialogInterface;
import android.os.Bundle;
import android.view.View;
import android.view.View.OnClickListener;
import android.widget.Button;

public class MainActivity extends Activity {

 final Context context = this;
 private Button button;

 public void onCreate(Bundle savedInstanceState) {

  super.onCreate(savedInstanceState);
  setContentView(R.layout.main);

  button = (Button) findViewById(R.id.buttonAlert);

  // add button listener
  button.setOnClickListener(new OnClickListener() {

  @Override
  public void onClick(View arg0) {

   AlertDialog.Builder alertDialogBuilder = new AlertDialog.Builder(
    context);

   // set title
   alertDialogBuilder.setTitle("Your Title");

   // set dialog message
   alertDialogBuilder
    .setMessage("Click yes to exit!")
    .setCancelable(false)
    .setPositiveButton("Yes",new DialogInterface.OnClickListener() {
     public void onClick(DialogInterface dialog,int id) {
      // if this button is clicked, close
      // current activity
      MainActivity.this.finish();
     }
      })
    .setNegativeButton("No",new DialogInterface.OnClickListener() {
     public void onClick(DialogInterface dialog,int id) {
      // if this button is clicked, just close
      // the dialog box and do nothing
      dialog.cancel();
     }
    });

    // create alert dialog
    AlertDialog alertDialog = alertDialogBuilder.create();

    // show it
    alertDialog.show();
   }
  });
 }
}
3. Demo
Start it, display a button.
How to add more home screens in Android 4.4 KitKat
The launcher — the app that controls how your home screens look and act — arguably is the most important part of an Android smartphone. And from the earliest devices, we've seen manufacturers and app developers diverge from Google's solution and roll their own interpretations. (To varying degrees of success, for sure.)
In Android 4.4 KitKat, Google changed things up once more adding a couple of simple but much-needed features — the ability to add home screens, and the ability to rearrange your home screens.
Oh, Google Now is still attached to the far left — that's not going anywhere anytime soon, probably. But these new additions are welcomed, and easy to get used to.
We've got your primer videos after the break.
KitKat makes it easier to swap or uninstall custom launchers
Many of us enjoy using custom home screen launchers on our Android phones, but the process of switching between them has never been entirely foolproof. That's changed in the latest Android 4.4 KitKat, which introduces a new top-level menu in the Settings app allowing you to select your default launcher. That means you don't have to traipse into the Apps menu, find your custom launcher, then clear its defaults to change back. The new Home menu also gives you an easy way to uninstall custom launchers, by pressing the trash icon next to it.Check out our video above for a quick walkthrough on the Nexus 5.